Knowledge Centre
Need an overview? Read:RESIN BOUND VS RESIN BONDED?
Product Application: Applying Resin & Stone
Before You Start!
There are some critical factors to be taken into consideration before you start:
- Weather – Ambient temperature must be above 5 degrees Celsius and below 30 degrees Celsius
- Weather – Is rain imminent? – If it is, postpone!
- The base must be dry/cured. (We strongly recommend purchasing a simple ‘damp detector (Approx. £10/ Screwfix) and testing the surface prior to installing the resin surface.
- Manhole covers, edges etc. must be masked off using QUALITY gaffer tape.
- Set warning bollards at access to drive to stop unsuspecting members of the public wandering onto your work!
Setting up the site correctly will maximise your efficiency. Set up a mixing area (On a plastic sheet or tarpaulin). Ensure you have plastic rubbish sacks close to mixing site to dispose of used containers.
Be careful of drips and where you walk – inadvertently dripping hardener or resin and walking it onto the surface could permanently stain the surface!
Empty approx. 3 x 25kg bags of stone into a wheelbarrow and mix thoroughly by hand (natural stone shades can vary slightly between bags). Once the job has started, ensure wheelbarrow is topped up when it gets half empty ensuring contents are again mixed thoroughly by hand.
Where to Start?
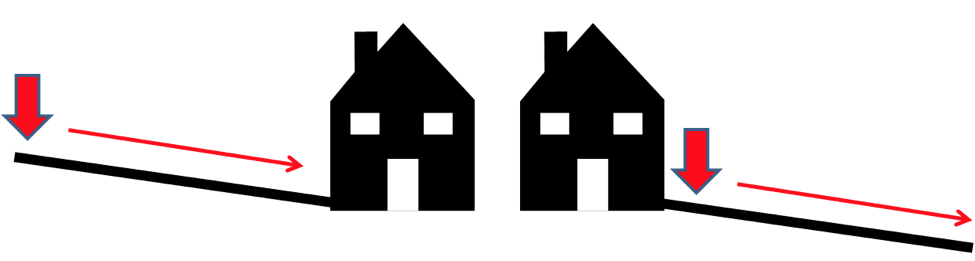
Most driveways will have a slight fall either toward or away from the house. Start the application of resin and stone as indicated in the diagram below.
NOTE: If the gradient is greater than 1:12 then it is advisable to use Thixotropic fibres, this thickening agent must be thoroughly mixed into the Resin (Part A), prior to adding Part B. The Thixotropic fibres will reduce the risk of the resin flowing down the slope. Add approx. 2 cupped handfuls to each 5 sqm. tub (This will vary depending on severity of slope)
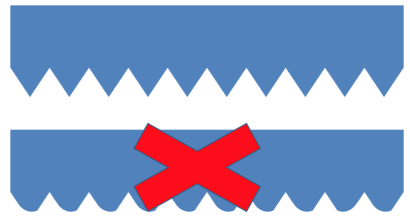
And finally, before you start..... CHECK YOUR SQUEEGEE!
Depending on usage, your resin applicator squeegee will start to wear down (See below). Do not be tempted to use your squeegee if the serrations are rounded and worn, this will result in insufficient resin for the stone to bond correctly and your customer will be calling you back in no time! – Discard and re-order. Or recut.
Just a few last important points!
The Hardener (PART B) is corrosive and will also stain if dripped onto completed surface. Ensure suitable protective gloves and eye goggles are worn and familiarise yourself and co-workers with the Health and safety guidance.
Keeping your work area clean and disposing of used resin and hardener tubs immediately will reduce the risk of spillages which could be trafficked onto completed surface.
Up until this point, all stages could be completed with one person. When applying the resin and stone it is advised that at least two (Preferably three) people are used for this stage.
Person 1
Mixing and applying resin
Person 2
‘Broadcasting’ stone onto resin
Person 3
Ensuring that wheelbarrow containing stone is kept full and mixed.
IMPORTANT – The Resin (Part A) can separate during storage – This is perfectly normal. If this does happen, please ensure you mix the resin thoroughly prior to adding the hardener and /or Thixotropic fibres.
IMPORTANT - Once the resin and hardener are mixed, they will start to cure immediately; this process will be accelerated the longer the mixed resin is left in the tub. Pouring the entire mixed contents onto the surface immediately will slow this curing process down. Either way, you will only have a few minutes to spread the resin and apply the stone before needing to apply the next mix of resin (depending on ambient temperature)
IMPORTANT-If there are any DRAINS, UTILITY COVERS or areas that you do not want resin to flow onto, ensure they are protected using duct tape and/ or boards. Please note if the resin is allowed to flow into the joint around a manhole cover, it will be extremely difficult to remove the cover once the resin has dried.
IMPORTANT - If using duct tape, ensure that you remove it before the resin has hardened. (Start to gently remove tape after about 10 minutes, if resin is still ‘runny’ leave for a little longer until the tape can be removed cleanly.
IMPORTANT – The resin/hardener is thermosetting, leaving either the hardener or resin out in the midsummer sunshine means that the product has already heated up BEFORE you even start mixing it!, therefore reducing the time you have to apply the resin and add the stone. Put it in the shade to reduce this impact.